
How can files on AWS be scanned for viruses? There is no built-in solution. But we can build our own using Lambda Functions and Layers.
Our solution involves packing the open-source antivirus engine ClamAV into a Lambda Layer and running the scan command from a Lambda Function.
This article only covers how to package ClamAV into a Lambda layer for use in Lambda functions.
Get the required ClamAV files
The first step in building the Lambda Layer is to obtain the necessary files from the RPM package in the Amazon Linux repository. To achieve this, we run a Dockerfile with the amazonlinux image and install ClamAV, then extract the files.
First, let’s create a config file for ClamAV called freshclam.conf.
DatabaseMirror db.de.clamav.net database.clamav.net
CompressLocalDatabase no
ScriptedUpdates no
LogVerbose yes
Next, create a file called dockerfile.
Although AWS states that the package name clamav should point to the latest ClamAV version, it only does when you run dnf install. When calling the dnf download command still points to the outdated version 0.103.12. Thats why we download explicitly clamav1.4.
# © 2025 cloudxs GmbH. All rights reserved. / dockerfile

FROM amazonlinux:2023

WORKDIR /home/build

RUN set -e

RUN echo "Prepping ClamAV"

RUN rm -rf bin
RUN rm -rf lib

RUN dnf update -y
RUN dnf install -y cpio \
                   dnf-plugins-core \
                   zip

RUN dnf download --arch x86_64 clamav1.4
RUN rpm2cpio clamav1.4-1*.rpm | cpio -vimd

RUN dnf download --arch x86_64 clamav1.4-lib
RUN rpm2cpio clamav1.4-lib*.rpm | cpio -vimd

RUN dnf download --arch x86_64 clamav1.4-update
RUN rpm2cpio clamav1.4-freshclam*.rpm | cpio -vimd

RUN dnf download --arch x86_64 json-c
RUN rpm2cpio json-c*.rpm | cpio -vimd

RUN dnf download --arch x86_64 pcre2
RUN rpm2cpio pcre*.rpm | cpio -vimd

RUN dnf download --arch x86_64 libtool-ltdl
RUN rpm2cpio libtool-ltdl*.rpm | cpio -vimd

RUN dnf download --arch x86_64 libxml2
RUN rpm2cpio libxml2*.rpm | cpio -vimd

RUN dnf download --arch x86_64 bzip2-libs
RUN rpm2cpio bzip2-libs*.rpm | cpio -vimd

RUN dnf download --arch x86_64 xz-libs
RUN rpm2cpio xz-libs*.rpm | cpio -vimd

RUN dnf download --arch x86_64 gnutls
RUN rpm2cpio gnutls*.rpm | cpio -vimd

RUN dnf download --arch x86_64 nettle
RUN rpm2cpio nettle*.rpm | cpio -vimd

RUN dnf download --arch x86_64 openldap
RUN rpm2cpio openldap*.rpm | cpio -vimd

RUN dnf download --arch x86_64 pcre
RUN rpm2cpio pcre*.rpm | cpio -vimd

RUN dnf download --arch x86_64 nss
RUN rpm2cpio nss*.rpm | cpio -vimd

RUN dnf download --arch x86_64 libssh2
RUN rpm2cpio libssh2*.rpm | cpio -vimd

RUN mkdir -p bin
RUN mkdir -p lib
RUN mkdir -p var/lib/clamav
RUN chmod -R 777 var/lib/clamav

COPY ./freshclam.conf .

RUN cp usr/bin/clamscan usr/bin/freshclam bin/.
RUN cp -R usr/lib64/* lib/.
RUN cp freshclam.conf bin/freshclam.conf

# Copy some libraries separately
RUN cp /lib64/libcurl* lib/.
RUN cp /lib64/libcrypt* lib/.
RUN cp /lib64/libnss* lib/.
RUN cp /lib64/libunistring* lib/.
RUN cp /lib64/libgcrypt* lib/.
RUN cp /lib64/libssl* lib/.
RUN cp ./usr/lib64/libssh2* lib/.
RUN cp /lib64/libidn2* lib/.
RUN cp /lib64/libnghttp2* lib/.
RUN cp ./usr/lib64/libsmime3* lib/.

RUN yum install shadow-utils.x86_64 -y

RUN groupadd clamav
RUN useradd -g clamav -s /bin/false -c "Clam Antivirus" clamav
RUN useradd -g clamav -s /bin/false -c "Clam Antivirus" clamupdate

RUN LD_LIBRARY_PATH=./lib ./bin/freshclam --config-file=bin/freshclam.conf

RUN zip -r9 clamav_lambda_layer.zip bin
RUN zip -r9 clamav_lambda_layer.zip lib
RUN zip -r9 clamav_lambda_layer.zip var
RUN zip -r9 clamav_lambda_layer.zip etc
The Dockerfile above creates a new container with ClamAV and all its required libraries in a ZIP archive within the container. This means we need to extract it. For this, we have a bash script called build.sh that builds the container, runs it, copy the layer.zip and extract into a directory called layer.
#!/bin/bash

# © 2025 cloudxs GmbH. All rights reserved. / build.sh

set -e

rm -rf ./layer
mkdir layer

docker build -t clamav -f Dockerfile --progress=plain .
docker run --name clamav clamav
docker cp clamav:/home/build/clamav_lambda_layer.zip .
docker rm clamav
mv clamav_lambda_layer.zip ./layer

pushd layer
unzip -n clamav_lambda_layer.zip
rm clamav_lambda_layer.zip
popd
Now, all the files we need to run ClamAV in a Lambda function are in the directory called layer.
Create the Lambda Layer
Of course, deploying Lambda Functions and Lambda Layers depend a lot on the IAC tool you use. We use SST, which is Pulumi under the hood.
To create a Lambda Layer with SST or Pulumi, all you need to do is package the layer directory from the previous step. Our deployment looks similar to this.
const avLayerOutputDir = 'workspaces/antivirus/lambda/clamav_bin/layer';
const layerAvBinaries = new aws.lambda.LayerVersion(
  `clamav-bin-${$app.stage}`,
  {
    layerName: `clamav-bin-${$app.stage}`,
    code: $asset(avLayerOutputDir),
    compatibleRuntimes: ['nodejs20.x', 'nodejs22.x'],
  },
);
CI/CD pipeline
We build and deploy the Lambda Layer in an Azure DevOps pipeline. To improve pipeline speed, we implemented a caching step. In order to make proper use of the caching, we need to know the most current ClamAV version. The following fragment is the build stage of our pipeline.
variables:
  - name: CACHE_HIT_LAMBDA_LAYER
    value: 'false'

pool:
  vmImage: ubuntu-latest

stages:
  - stage: Build
    jobs:
      - job: build_lambda_layer
        displayName: Build Lambda Layer
        steps:
          - bash: bash getClamavVersion.sh
            displayName: Get ClamAV version
            workingDirectory: $(System.DefaultWorkingDirectory)/workspaces/antivirus/lambda/clamav_bin

          - task: Cache@2
            displayName: Cache lambda layer
            inputs:
              key: 'amazonlinux | "$(Agent.OS)" | "Clamav $(clamav_version)"'
              path: $(System.DefaultWorkingDirectory)/workspaces/antivirus/lambda/clamav_bin/layer
              cacheHitVar: CACHE_HIT_LAMBDA_LAYER

          - bash: bash build.sh
            displayName: Build lambda layer
            workingDirectory: $(System.DefaultWorkingDirectory)/workspaces/antivirus/lambda/clamav_bin
            condition: ne(variables.CACHE_HIT_LAMBDA_LAYER, 'true')

          - script: ls -lisah
            displayName: List files in the working directory
            workingDirectory: $(System.DefaultWorkingDirectory)/workspaces/antivirus/lambda/clamav_bin/layer

          - publish: $(System.DefaultWorkingDirectory)/workspaces/antivirus/lambda/clamav_bin/layer
            artifact: layer
The first step in the build job calls the script getClamavVersion.sh. This script runs the amazonlinux container, gets the latest clamav version and writes it into an pipeline variable.
#!/bin/bash
# © 2025 cloudxs GmbH. All rights reserved. / getClamavVersion.sh

AZLINUX_IMAGE="amazonlinux:2023"
CLAMAV_PKG="clamav1.4"

docker run --rm $AZLINUX_IMAGE bash -c "CAVERSION=\$(dnf info $CLAMAV_PKG | grep Version | awk -F: '{print $2}');

echo \"##vso[task.setvariable variable=clamav_version]\$CAVERSION\""
How to use
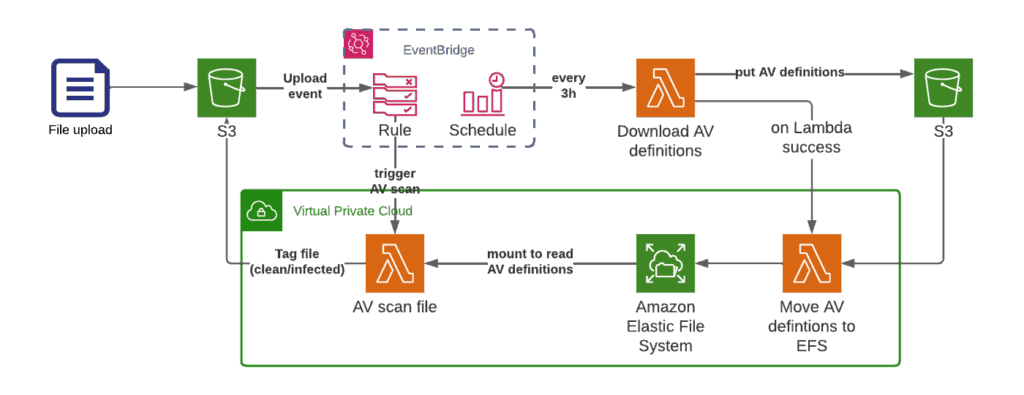
We use a separate scheduled Lambda function to download the new Antivirus definitions every three hours and upload them to S3. Afterwards a second Lambda gets triggered, that moves the AV Definitions to EFS. Since Lambda has a limit of 500MB storage, we need the EFS anyway to handle larger files.
The EFS is mounted as well to the Scanning Lambda function, so that we have the definitions available. The Scanning Lambda function gets triggered by S3 PutObject events. Due to the memory limits of AWS Lambda, we only scan files up to 2GB.
const PATH_TO_FRESHCLAM = 'freshclam';
const PATH_TO_CLAMAV = 'clamscan';
const FRESHCLAM_CONFIG = '/opt/bin/freshclam.conf';
const FRESHCLAM_WORK_DIR = process.env.FRESHCLAM_WORK_DIR || '/tmp';
const TMP_AVDEFINITION_DIR = '/tmp/avdefinitions';

/**
 * Updates the definitions using freshclam.
 *
 * It will download the definitions to the current work dir.
 */
export function updateAVDefinitonsWithFreshclam() {
  try {
    execSync('ls -lisah /opt');
    const executionResult = execSync(
      `${constants.PATH_TO_FRESHCLAM} --config-file=${constants.FRESHCLAM_CONFIG} --datadir=${constants.TMP_AVDEFINITION_DIR}`,
      { cwd: '/opt' }
    );

    generateSystemMessage('Update message');
    console.log(executionResult.toString());

    if (executionResult.stderr) {
      generateSystemMessage('stderr');
      console.log(executionResult.stderr.toString());
    }

    return true;
  } catch (err) {
    console.log(err);
    return false;
  }
}

/**
 * Function to scan the given file. This function requires ClamAV and the definitions to be available.
 * This function does not download the file so the file should also be accessible.
 *
 * Three possible case can happen:
 * - The file is clean, the clamAV command returns 0 and the function return "CLEAN"
 * - The file is infected, the clamAV command returns 1 and this function will return "INFECTED"
 * - Any other error and the function will return null; (falsey)
 *
 * @param pathToFile Path in the filesystem where the file is stored.
 */
export function scanLocalFile(pathToFile) {
  try {
    execSync(
      `${constants.PATH_TO_CLAMAV} -v -a --stdout --database=${constants.EFS_AVDEFINITION_DIR}/ '${constants.FRESHCLAM_WORK_DIR}/tmp/${pathToFile}'`
    );

    generateSystemMessage('SUCCESSFUL SCAN, FILE CLEAN');

    return constants.STATUS_CLEAN_FILE;
  } catch (err) {
    // Error status 1 means that the file is infected.
    if (err.status === 1) {
      generateSystemMessage('SUCCESSFUL SCAN, FILE INFECTED');
      return constants.STATUS_INFECTED_FILE;
    } else {
      generateSystemMessage('-- SCAN FAILED --');
      console.log(err);
      return constants.STATUS_ERROR_PROCESSING_FILE;
    }
  }
}


/**
 * Uploads the AV definitions to S3 bucket.
 */
export async function uploadAVDefinitions() {
  const uploadPromises = constants.CLAMAV_DEFINITIONS_FILES.map((filenameToUpload) => {
    generateSystemMessage(`Upload updated definitions for file ${filenameToUpload}`);

    const options = {
      Bucket: constants.CLAMAV_BUCKET_NAME,
      Key: `${constants.PATH_TO_AV_DEFINITIONS}/${filenameToUpload}`,
      Body: fs.createReadStream(path.join(constants.TMP_AVDEFINITION_DIR, filenameToUpload)),
    };

    const data = client
      .send(new PutObjectCommand(options))
      .then((data) => {
        generateSystemMessage(`Upload finished ${filenameToUpload}`);
        return data;
      })
      .catch((err) => {
        generateSystemMessage(`Error uploading ${filenameToUpload}`);
        console.log(err);
      });
    return data;
  });

  return await Promise.all(uploadPromises);
}
We hope this article helps anyone who is facing the challenges of packaging the ClamAV antivirus in a Lambda Layer.
Sincerely, Andy from cloudxs